Using an HDD for the proxmox host, the VMs and the containers was causing delays and long iowait.After upgrading to an SSD there was a spare 1TB hard drive that could be used for storing containers that write constantly big chunks of data to the hdd,something that can cause increased wear to the ssd.
Since the needs are not complicated the setup is simple and does not use raid,zfs etc.
After the hdd setup, an elasticsearch stack container with netflow analysis was moved to the hdd,and although the read speeds do not match the performance of the containers running from the ssd, the hdd not having anything else running has an amazing increase in data read compared to the previous setup where the proxmox host and the VMs were based on the same hdd.
This tutorial covers the following subjects:
- How to partition and format a hard disk added to our baremetal host
- possible use cases for the new partition
Identify the new disk
Check the layout of the disks attached to the server to find the device names assigned to the disks by the proxmox host OS (Debian 9):
lsblk
Copy
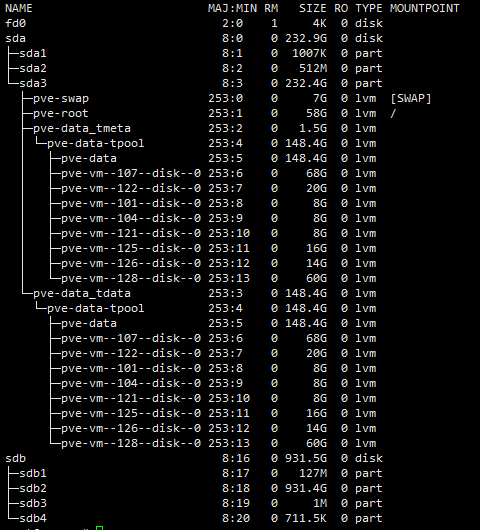
In the example we have disks sda and sdb.
sda has the current debian os with Proxmox VE installed and some vms.The new disk is sdb which retains the old setup.We’ll clear all contents from sdb since we have already moved the vms to the new sda disk and verified they are working.
Log in to Promox web portal
Select correct Proxmox Node and click on Disks
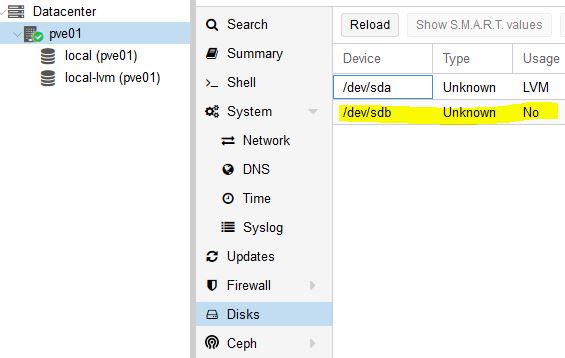
You can see new Physical hard drive is showing /dev/sdb
Open Proxmox VE Node’s Shell

Use fdisk command to create partition that is less than 2TB
root@pve01:~# fdisk /dev/sdb

Welcome to fdisk (util-linux 2.29.2).
Changes will remain in memory only, until you decide to write them.
Be careful before using the write command.

Command (m for help):
Create new partition type n and hit enter
Command (m for help): n
Partition type
 p primary (0 primary, 0 extended, 4 free)
 e extended (container for logical partitions)
Select partition type p for Primary and select default value for Partition Number, First Sector and Last Sector.
Partition number (1-4, default 1):
First sector (2048-16777215, default 2048):
Last sector, +sectors or +size{K,M,G,T,P} (2048-16777215, default 16777215):

Created a new partition 1 of type 'Linux' and of size 8 GiB.
Save partition – type w and hit enter.
Command (m for help): w
The partition table has been altered.
Calling ioctl() to re-read partition table.
Syncing disks.
How to Format and partition a disk Bigger than 2TB using parted
check existence in the system and install parted:
apt policy parted
Copy
apt install parted
Copy
Create a new partition table of type GPT,a newer and better standard than the older MBR:
parted /dev/sdb mklabel gpt
Copy

lsblk : result of parted /dev/sdb mklabel gpt
Make a primary partition for filesystem ext4 utilizing 100% of the disk:
parted -a opt /dev/sdb mkpart primary ext4 0% 100%
Copy

lsblk
Create the ext4 filesystem on the newly created partition sdb1 with a volume label we want.Giving a label to a partition is the recommended method since when adding or removing drives the device name sdb1 could change.
mkfs.ext4 -L storageprox /dev/sdb1
Copy
lsblk -fs
Copy

Now we can mount the drive in a folder we like.For a more unified appearence and ease of use we choose mnt/.
Create a folder inside mnt/ that will host the data of the new disk:
mkdir -p /mnt/data
Copy
Edit fstab file and enter a line with the mount options:
nano /etc/fstab
Copy
LABEL=storageprox /mnt/data ext4 defaults 0 2
Copy
mount the new drive:
mount -a
Copy

lsblk final
The HDD drive is now ready for use.Below we see common usage cases in Proxmox VE.
Use the new disk as backup
Backup our VMs and LXC containers in the new HDD drive.
Create a directory to store the backups:
mkdir -p /mnt/data/backup/
Copy
Now in the Proxmox GUI go to Datacenter -> Storage -> Add -> Directory.
In the directory option input the directory we created and select VZDump backup file:
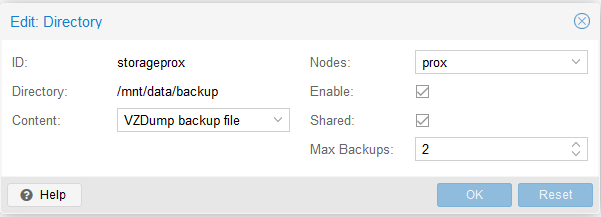
Finally schedule backups by going to Datacenter – > Backups.The new directory will be available in the backup options.
Use the new disk to run VMs
As mentioned in the beginning of the article we can select specific VMs or containers that do heavy writing on the SSD to run from the HDD.
Create a directory for the VMs:
mkdir -p /mnt/data/hdd-img/
Copy
In the Proxmox GUI go to Datacenter -> Storage -> Add -> Directory .
In the directory option input the directory we created and select Disk image,container :

Now when restoring a backup image or creating a new VM or container, in the storage selection we have the option of hdd-img, the ID of the new storage we added.

Final result for both types of content